Intro
So I finally got myself a clean Windows 10 VM for the next couple of years development, installed Visual Studio 2015, downloaded OpenCV, migrated my VS2013 OpenCV C++ test app, and.. and.. of course it didn’t work 😦
This was only an issue because I was using the static OpenCV libraries rather than the pre-built binaries. It looks like VS2015 is quite happy using the VC12 OpenCV binaries.
The current release of OpenCV 3.0.0 (04/06/2015) comes with pre-built static and import libraries for VS2013 and VS2010, but not for VS2015. I found an excellent article on the Colorado School of Mines (!) WebSite on how to build VS2015 libraries. But I needed some other tweaks beyond a basic build of OpenCV. So the goal of this note is to show how I built OpenCV for use with Visual Studio 2015 with the following configurations:
- 32- and 64-bit support.
- Static and Shared OpenCV libraries.
- Debuggable static libraries by having the correct combination of source code, libraries and PDBs.
The basic procedure I’m using (after several iterations) is:
- Clone version 3.0.0 of OpenCV to a local development folder. I’m going to keep these source files handy because the debugger can use them in Debug builds
- Install CMake, a build configuration tool.
- Generate 4 VS2015 solutions
- x86, static
- x86, shared
- x64, static
- x64, shared
Clone OpenCV
This assumes you have VS2015 and the latest Git for Windows.
The trick, at least for me, is to clone into a folder that will be used to keep the OpenCV source code. This folder won’t get deleted during the steps below. I’m also only interested in the official latest release, which at the time of writing is version 3.0.0.
I have a standard development folder structure which is currently based on c:\dev, and I have a standard sub-folder structure for all third party libraries, c:\dev\ThirdParty. So I’m going to put OpenCV into c:\dev\ThirdParty\OpenCV3.0.0.
Run a git bash shell (from any folder) and clone version 3.0.0. Note the use of forward slashes in both paths !
Here’s my bash session:
jon@DESKTOP-0J37S2C MINGW64 /c/dev/ThirdParty/OpenCV3.0.0 ((3.0.0))
$ git clone --branch 3.0.0 https://github.com/Itseez/opencv.git C:/dev/ThirdParty/OpenCV3.0.0/sources
Cloning into 'C:/dev/ThirdParty/OpenCV3.0.0/sources'...
remote: Counting objects: 183285, done.
remote: Compressing objects: 100% (52/52), done.
remote: Total 183285 (delta 22), reused 6 (delta 6), pack-reused 183224
Receiving objects: 100% (183285/183285), 419.28 MiB | 3.54 MiB/s, done.
Resolving deltas: 100% (124890/124890), done.
Checking connectivity... done.
Note: checking out 'c12243cf4fccf5df7b0270a32883986b373dca7b'.

You are in 'detached HEAD' state. You can look around, make experimental
changes and commit them, and you can discard any commits you make in this
state without impacting any branches by performing another checkout.

If you want to create a new branch to retain commits you create, you may
do so (now or later) by using -b with the checkout command again. Example:

  git checkout -b <new-branch-name>
Checking out files: 100% (4656/4656), done.
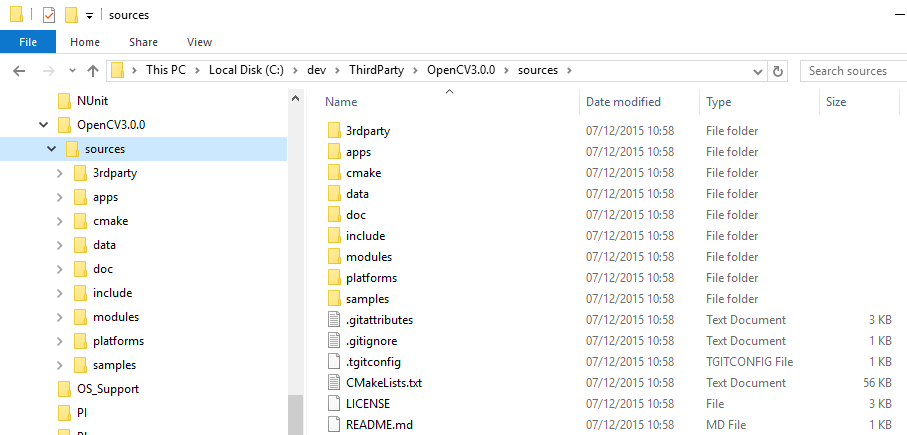
Now I have the following folder structure:
Get CMake
There isn’t a VS2015 solution bundled with the OpenCV download so you must create one. This is made easy by using CMake, a cross-platform build utility. Download and install from here – I used the Windows (Win32 Installer) ‘cmake-3.4.1-win32-x86.exe’, and kept the default installation options.
Create the VS2015 Solutions
The basic procedure with CMake is:
- Set the source and build folders
- Click Configure
- Choose the generator (compilers)
- Tweak the options
- Click Generate
I’m going to place each solution in a unique build folder and will start with:
- 32-bit (x86)
- Shared OpenCV_World300.dll
- Static C runtime (CRT)
- No test libraries (because they don’t build cleanly for me, and I want a clean build for the moment)
Run CMake and set the source code folder. Then choose a folder for the build. Make sure the build folder doesn’t already exist. E.g.

The click Configure, accept any request to create the build folder, and then choose the generator for the project. For x86:

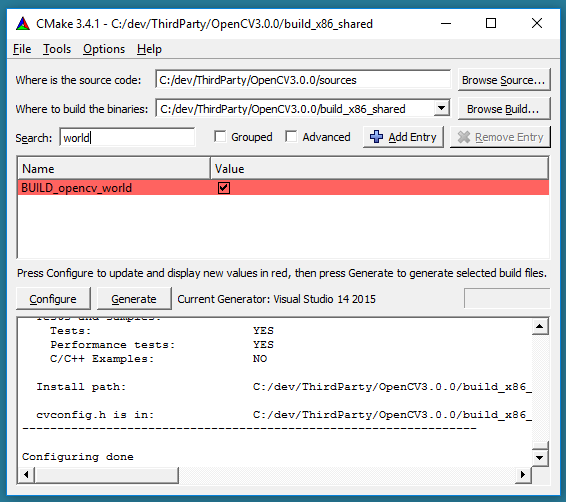
The first pass at the configuration takes a minute or so and may download some IPPI files. It also ends up looking quite bad but the red items are just new values (which initially means everything):

Use the Search box to find and verify/update the following settings:
- BUILD_opencv_world: True
- BUILD_SHARED_LIBS: True
- BUILD_WITH_STATIC_CRT: True
- BUILD_PERF_TESTS, BUILD_TESTS: False
For example, to find and update the OpenCV_World option:
Click Generate. Then check you have a new VS2015 solution (but don’t open or build yet):
- C:\dev\ThirdParty\OpenCV3.0.0\build_x86_shared\OpenCV.sln
For the remaining 3 VS2015 solutions first change the build path, click Configure, apply the settings, and click Generate.
- x86, static
- Build path: C:/dev/ThirdParty/OpenCV3.0.0/build_x86_static
- Generator: Visual Studio 14 2015
- BUILD_opencv_world: False
- BUILD_SHARED_LIBS: False
- BUILD_WITH_STATIC_CRT: False
- BUILD_PERF_TESTS, BUILD_TESTS: False
- x64, shared
- Build path: C:/dev/ThirdParty/OpenCV3.0.0/build_x64_shared
- Generator: Visual Studio 14 2015 Win64
- BUILD_opencv_world: True
- BUILD_SHARED_LIBS: True
- BUILD_WITH_STATIC_CRT: True
- BUILD_PERF_TESTS, BUILD_TESTS: False
- x64, static
- Build path: C:/dev/ThirdParty/OpenCV3.0.0/build_x64_static
- Generator: Visual Studio 14 2015 Win64
- BUILD_opencv_world: False
- BUILD_SHARED_LIBS: False
- BUILD_WITH_STATIC_CRT: False
- BUILD_PERF_TESTS, BUILD_TESTS: False
Build x86 static
Close CMake and open VS2015, then open the x86 static solution:
- C:\dev\ThirdParty\OpenCV3.0.0\build_x86_shared\OpenCV.sln
Give it a minute or two for the parsing stage to complete, select the Debug|Win32 configuration, and build the solution.

I got the following output:
Build: 14 succeeded, 0 failed, 0 up-to-date, 5 skipped
Next build the CMakeTargets/INSTALL project – this will put the output files in an install folder which we’ll use later on:

You can check you have the opencv_world300 debug DLL:

Now switch to the Release|Win32 configuration, build the solution, and build the CMakeTargets/INSTALL project. This will add the opencv_world release DLL to the install folder.
Now open the x64 shared solution and repeat the above to get the debug and release opencv_world300 DLLs. Note the configurations are:
Open the x86 static solution: before build we must fix a glitch with the PDB file names. For some reason the debug PDBs were not configured to have a d appended to the filename. This means the debug and release PDBs will all use the same filenames. For example:
- IlmImf.lib -> IlmImf.pdb
- IlmImfd.lib -> IlmImf.pdb
There is probably a quick way to fix this using the CMake tools, but I don’t know how to ! Instead, do the following:
- Multi-select all the projects in the 3rdparty group

- Open the Property Pages (right-click and select Properties).
- Set the Configuration to ‘All Configurations’
- Navigate in the tree-view to C/C++ / General
- Change the ‘Debug Information Format’ to ‘C7 compatible’

- Hit OK to apply the changes and close the Property Pages.
Repeat the above procedure for all projects in the following groups:
- applications
- modules
- object_libraries
Why do this ?
- Instead of producing .lib and .pdb files we now have the PDB information merged into the .lib.
- It solves the problem of the debug build PDBs not having different names from the release equivalents.
- The CMakeTargets/INSTALL project doesn’t copy the PDBs, meaning a further manual step would be required to find the PDBs and copy them to the install folder.
Is there a better way – I’m sure there is, but this is quite simple and quick and if it works then why not ? (One good reason to not use this approach is if you’re going to work on the OpenCV source code; using the C7 option takes away certain compiler and linker options that could make for much faster builds). There’s plenty of discussion on the web about this, for example on StackOverflow.
Repeat the previous build procedure to get the Debug and Release builds and INSTALLs done. Then repeat again for the x64 (remembering to modify the Debug Information Format settings first).
Consolidating the build
I want to replicate the folder structure of the official release of OpenCV as much as possible. So first, create a new build folder:
- C:\dev\ThirdParty\OpenCV3.0.0\build
Then copy the contents of each of the install folders into the above build folder. Skip over duplicate files.
- build_x64_shared
- build_x64_static
- build_x86_shared
- build_x86_static
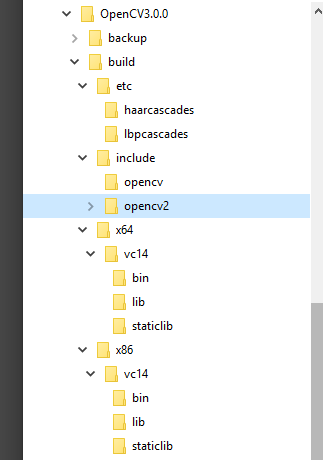
My final folder structure is around 1.2GB and looks like this
All four of the build_XXX folders can now be deleted – for me they take up around 10GB. Alternatively you can reload each solution, select Batch Build, Select All, then clean. This drops the folders down to around 2GB. For me I’m going to ZIP and archive them, in case I made a mistake !
Testing the build
One of my requirements is to make sure colleagues can work with these libraries, even if they use a different folder structure to me for their own projects. The only prerequisite is that there’s a ThirdParty\OpenCV3.0.0 folder; but ThirdParty can be anywhere.
My first trick is to make a User Macro in VS2015 to set the ThirdParty folder location. This is another example of something that could probably be done better, but I don’t want to change the system PATH and I need something simple. My reference for User Macros is from this MSDN page.
- Open or create a C++ project.
- View the Property Manager:

- Select the Microsoft.Cpp.Win32.user node of any project, right-click and select Properties. Then select the User Macros setting and add a Macro called ThirdParty:

- Apply the changes and close the dialog, then close the Property Manager.
The macro can now be used in projects which may be distributed among other developers; each developer just needs to have their ThirdParty folder (with OpenCV3.0.0 inside) and this macro.
As an example, I have a 32-bit project using the static OpenCV library. The key settings are:
Additional Include Directories:
Additional Library Directories:
Additional Dependencies: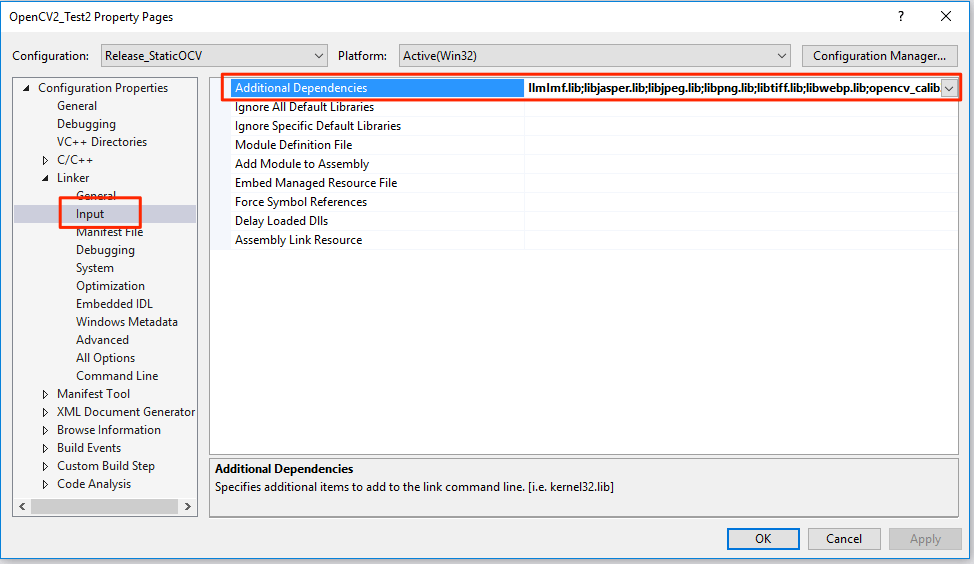
The list of dependencies for my Release build is:
IlmImf.lib
libjasper.lib
libjpeg.lib
libpng.lib
libtiff.lib
libwebp.lib
opencv_calib3d300.lib
opencv_core300.lib
opencv_features2d300.lib
opencv_flann300.lib
opencv_hal300.lib
opencv_highgui300.lib
opencv_imgcodecs300.lib
opencv_imgproc300.lib
opencv_ml300.lib
opencv_objdetect300.lib
opencv_photo300.lib
opencv_shape300.lib
opencv_stitching300.lib
opencv_superres300.lib
opencv_ts300.lib
opencv_video300.lib
opencv_videoio300.lib
opencv_videostab300.lib
zlib.lib
ippicvmt.lib
And for my debug build it is:
IlmImfd.lib
libjasperd.lib
libjpegd.lib
libpngd.lib
libtiffd.lib
libwebpd.lib
opencv_calib3d300d.lib
opencv_core300d.lib
opencv_features2d300d.lib
opencv_flann300d.lib
opencv_hal300d.lib
opencv_highgui300d.lib
opencv_imgcodecs300d.lib
opencv_imgproc300d.lib
opencv_ml300d.lib
opencv_objdetect300d.lib
opencv_photo300d.lib
opencv_shape300d.lib
opencv_stitching300d.lib
opencv_superres300d.lib
opencv_ts300d.lib
opencv_video300d.lib
opencv_videoio300d.lib
opencv_videostab300d.lib
zlibd.lib
ippicvmt.lib
To make sure it’s all looking good I build the Debug configuration and check there are no spurious errors or warnings. (For example, before I switched to the C7 debug-info setting I had all sorts of warnings about missing PDBs.)
Then try setting a breakpoint on some OpenCV code and stepping into it: if all goes well you’ll be able to step into and around the OpenCV source code.
Note: if you move your OpenCV distribution to another folder then the debugger will prompt you for the location of the OpenCV source files. This only happens once (as far as I can tell).
To use the DLL version of OpenCV change the following:
- Linker/General/Additional Library Directories:
$(ThirdParty)\OpenCV3.0.0\build\x86\vc14\lib;%(AdditionalLibraryDirectories)
- Linker/Input/Additional Dependencies:
opencv_world300.lib
Note: if you run a shared DLL version without making the DLL available then you’ll get something like this:
‘The program can’t start because opencv_world300.dll is missing from your computer.’

To avoid changing the system PATH I added a post-build event to copy the DLL to my project’s output:
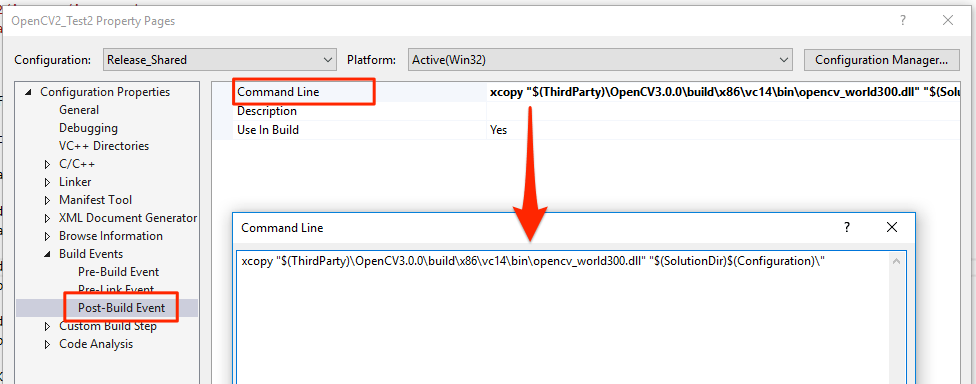
A good sample program to start with is Load and Display an Image, on the OpenCV website.
That’s it – I’m done ! After at least 10 variations of these builds, and two or three attempts to write up how I did it, I’m leaving it here. At least until I figure a better way to do it, or an update is issued from OpenCV, or I figure out how to try and contribute directly to OpenCV, etc. 🙂