Installing Subversion and Apache
In part 1 I documented how I installed the OS on my Raspberry Pi – bread and butter to a seasoned Linux developer but lots of Googling for a Windows programmer, even one using a MacBook Pro.
Now it’s time to install Subversion (for version control) and Apache (to provide secure web access to the Pi and to access the Subversion data).
Using the Mac’s Terminal application and a secure shell (SSH) session we can use apt-get to install the software:
jon@raspberrypi ~ $ sudo apt-get install subversion

jon@raspberrypi ~ $ sudo apt-get install apache2 libapache2-svn
We can test the Apache installation by connecting to the Pi from Safari on the MacBook Pro:

Setting up subversion
From the [default] home folder make a new folder to contain all Subversion repositories:
jon@raspberrypi ~ $ mkdir svnrepos
Note: the full path for this folder is: /home/jon/svnrepos
Next we must edit the Subversion/Apache configuration file to set the digest access authorisation mechanism for logging into Subversion via Apache. Digest authentication offers good security as far as user name and passwords are concerned.
The dav_svn.conf file provides configuration information used by Apache when serving Subversion repositories through the HTTP server:
jon@raspberrypi ~ $ sudo nano /etc/apache2/mods-available/dav_svn.conf
Replace the entire contents of the file with the block below:
<Location /svn>

DAV svn

SVNParentPath /home/jon/svnrepos

AuthType Digest

AuthName "Subversion Repo"

AuthUserFile /etc/apache2/dav_svn.htdigest

Require valid-user

</Location>
Note the AutoName property: "Subversion Repo": we’ll need that shortly when we start generating passwords.
Before we can use digest access authentication we must enable it and restart the Apache service:
jon@raspberrypi ~ $ sudo a2enmod auth_digest

jon@raspberrypi ~ $ sudo service apache2 restart
Finally we can set one user and password in the Apache/Subversion digest file:
jon@raspberrypi ~ $ sudo htdigest -c /etc/apache2/dav_svn.htdigest "Subversion Repo" jon
Note 1: the -c parameter: this is used to create a new digest file; remember to omit this once we have the file and want to add/remove/append users and passwords.
Note 2: we use "Subversion Repo" as the realm argument to htdigest; this must match the AuthName used in the dav_svn.conf file.
Make a temporary Subversion repository to help verify that everything is working:
jon@raspberrypi ~ $ svnadmin create svnrepos/pi_test
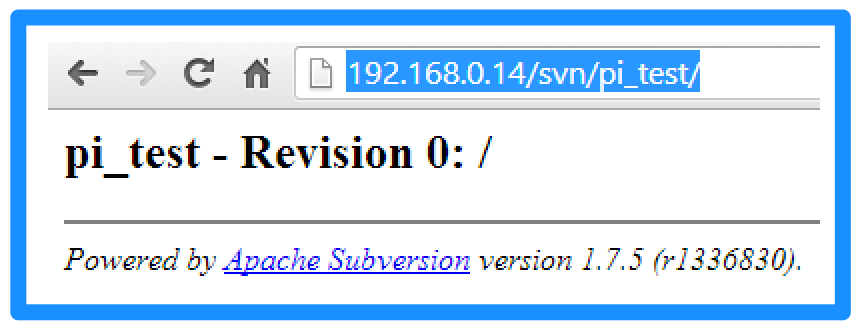
Use a browser to connect to the Subversion repository using this address:
http://192.168.0.14/svn/pi_test/
The browser will prompt for a user name and password: these must match the same values used when creating the digest authentication file. Once the browser has connected is should display the following:
Delete the test repository:
jon@raspberrypi ~ $ rm -rf svnrepos/pi_test/
Note: use -r to recurse sub-directories; use -f to force the deletion of files/folders without asking.
Repository folder ownership – important !
By default the Apache user (www-data, automatically created when Apache is installed) has permissions to read the svnrepos folder, but not to write to it. This means that any Subversion clients will be able to view a repository but not affect any changes. The following command will change the owner of the folder from jon to www-data (but don’t run it):
jon@raspberrypi ~ $ sudo chown -R www-data:www-data /home/jon/svnrepos
This will provide Apache (via the www-data user) with full access to svnrepos but will also prevent the jon user from being able to access the directory directly. (We could use the chown command again but it’s a bit tedious). A better option would be to have a group with permissions for reading and writing, and to assign this group to the folder. The following commands do this:
jon@raspberrypi ~ $ sudo groupadd svn-super

jon@raspberrypi ~ $ sudo usermod -aG svn-super jon

jon@raspberrypi ~ $ sudo usermod -aG svn-super www-data

jon@raspberrypi ~ $ sudo chown -R :svn-super /home/jon/svnrepos/

jon@raspberrypi ~ $ ls -l
total 4
lrwxrwxrwx 1 jon jon 44 Aug 27 17:46 pistore.desktop -> /usr/share/indiecity/pistore/pistore.desktop
drwxr-xr-x 4 jon svn-super 4096 Aug 28 08:20 svnrepos
Note in the above listing that the user that owns the svnrepos folder is still jon but the group owner is now svn-super.
The new group, svn-super, doesn’t have write permissions so we fix this now, restart the Pi, and review the permissions again
jon@raspberrypi ~ $ sudo chmod -R g+w svnrepos/

jon@raspberrypi ~ $ sudo shutdown -r now

…

jon@raspberrypi ~ $ ls -l

total 4

lrwxrwxrwx 1 jon jon 44 Aug 27 17:46 pistore.desktop -> /usr/share/indiecity/pistore/pistore.desktop

drwxrwxr-x 4 jon svn-super 4096 Aug 28 08:20 svnrepos
Note the difference in the permissions for the svnrepos directory:
Before: drwxr-xr-x
After: drwxrwxr-x
The format of the above is: TUUUGGGSSS, where:
T: the item type, in this case d for directory.
UUU: user permissions for read, write and execute.
GGG: group permissions for read, write and execute.
SSS: other permissions for read, write and execute.
This link provides more details on the ls -l long format output.
Migrating a repository to the Pi (or restore from a backup)
This section describes how I migrated my PC-based Subversion repositories onto the Pi using the dump and load commands. A hotcopy would probably have been better but at the time I’d gone with dump, mainly because it looked like the simplest option from Subversion Edge.
The migration plan is:
- Use SubversionEdge to backup the repositories to .dump files.
- Copy the .dump files to the Pi.
- Import the each .dump files into a new repository.
- Point any existing working copies to the new repository.
Refer to the SubversionEdge Web management tool for backing up a repository to a dump file.
I used SFTP (SSH File Transfer Protocol) to transfer files between the MacBook Pro and the Pi using pre-installed tools I can use SFTP from a terminal session on the Mac to push my .dump files onto the Pi.
Establish a connection:
$ sftp jon@192.168.0.14
Determine the current working directories, first the Pi and then the Mac:
sftp> lpwd

Local working directory: /Users/Jon

sftp> pwd

Remote working directory: /home/jon
Change the local directory to the location of the .dump files:
sftp> lcd "Downloads/Subversion Dumps"

sftp> lpwd

Local working directory: /Users/Jon/Downloads/Subversion Dumps
Push the files from the Mac to the Pi:
sftp> put AmberOptix3-r0_1758-20130827205309.dump.zip

Uploading AmberOptix3-r0_1758-20130827205309.dump.zip to /home/jon/AmberOptix3-r0_1758-20130827205309.dump.zip

AmberOptix3-r0_1758-20130827205309.dump.zip 100% 200MB 2.8MB/s 01:12
Then unzip to get hold of the .dump file:
jon@raspberrypi ~ $ unzip AmberOptix3-r0_1758-20130827205309.dump.zip

Archive: AmberOptix3-r0_1758-20130827205309.dump.zip

inflating: AmberOptix3-r0_1758-20130827205309.dump
Create a new repository and import the .dump file:
jon@raspberrypi ~ $ svnadmin load --force-uuid svnrepos/AmberOptix4/ < AmberOptix3-r0_1758-20130827205309.dump
The --force_uuid parameter will tell svnadmin to use the unique identifiers from the imported repository – this feature will allow users to relocate existing working copies.
Example output from the above:
<<< Started new transaction, based on original revision 1

* adding path : tags ... done.

------- Committed revision 1 >>>

<<< Started new transaction, based on original revision 2

* adding path : trunk ... done.

------- Committed revision 2 >>>

<<< Started new transaction, based on original revision 3

* adding path : trunk/ThirdParty ... done.
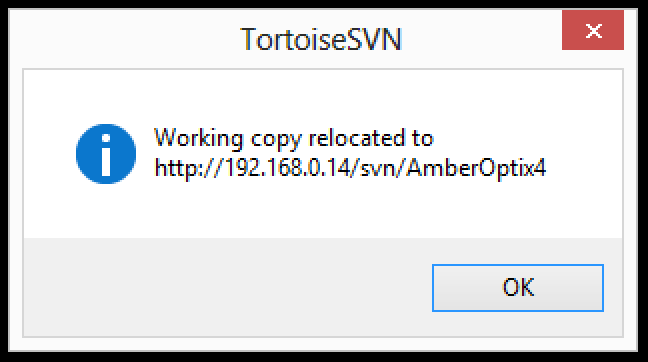
Finally we can update the location of the repositories of each working copy. With TortoiseSVN the following steps are required:
- Right-click on the top-level folder of the working copy.
- Select TortoiseSVN | Relocate, enter the new location:

Hit ok and wait the the confirmation:
In the final part of this write up I’ll document how I used a Python script and the Dropbox API to make a nightly backup of all my repositories.